Colony Flow Level 465 Walkthrough Solution & Guides | How to solve Colony Flow 465

Guide By Liam Stone
Updated on July 29, 2026
The video above solves Level 465 in real time, so skip the article if watching works better for you.
Video doesn't match your screen?
Game updates frequently scramble layouts! Try our AI Screenshot Solver first to find your exact board instantly, or report broken guides to our team.
Welcome back to another puzzle guide where I break down exactly how to conquer the toughest boards. Today we are looking at Colony Flow Level 465 and all the tricky mechanics it throws at you. This board features a beautiful landscape picture hidden behind some massive obstacles that will quickly ruin your run if you approach them out of order. You need a careful sequence to clear the field without jamming your five waiting slots and failing the level. I played through this one multiple times to find the safest path and I am ready to share exactly how to beat it.
Colony Flow Level 465 Overview
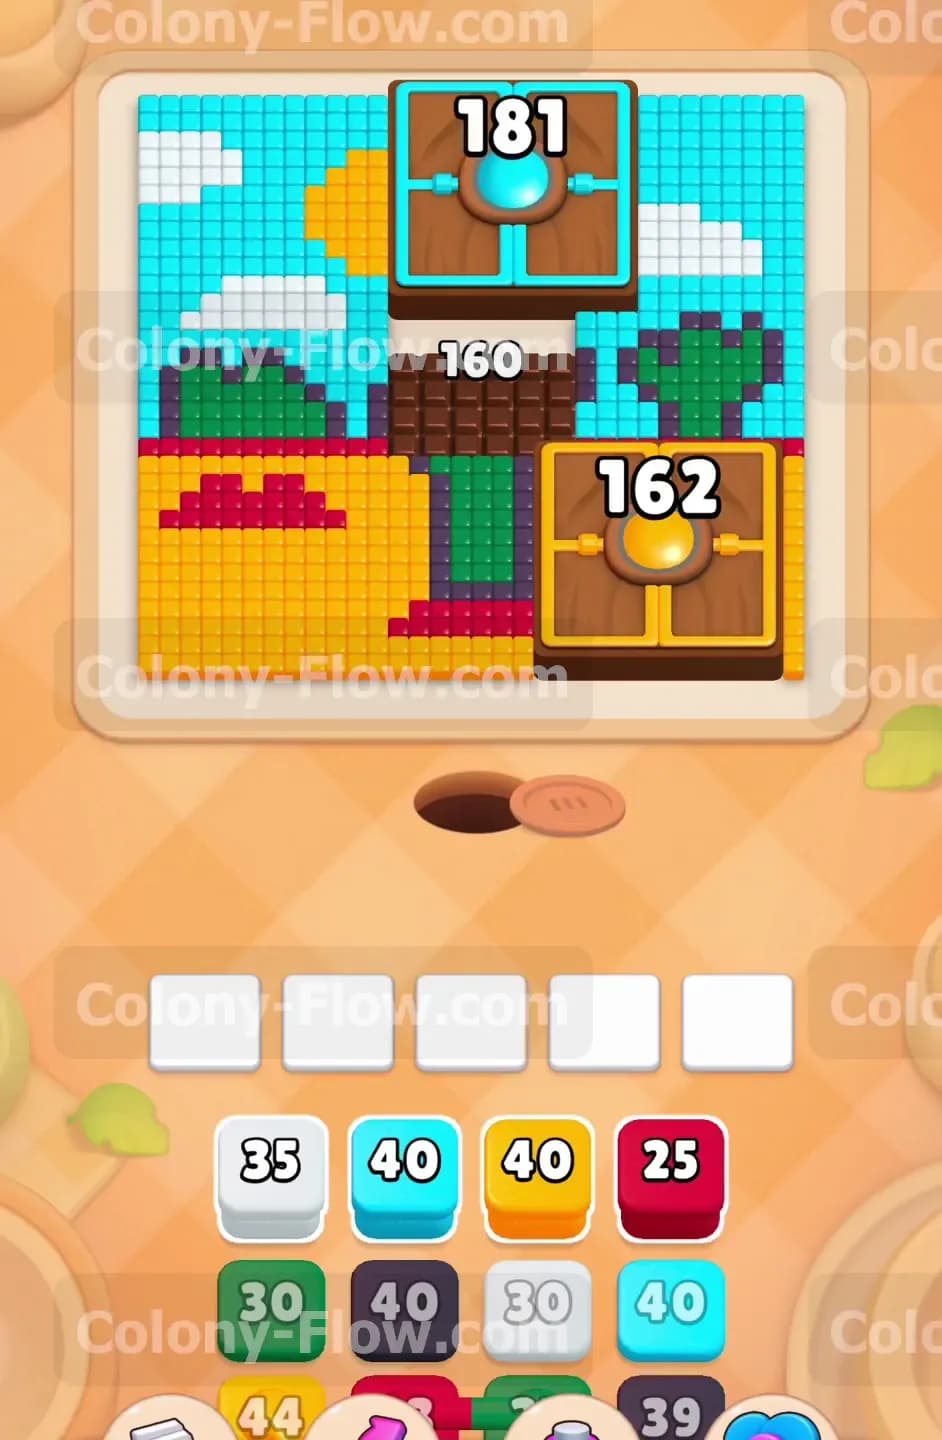
What You Are Working With
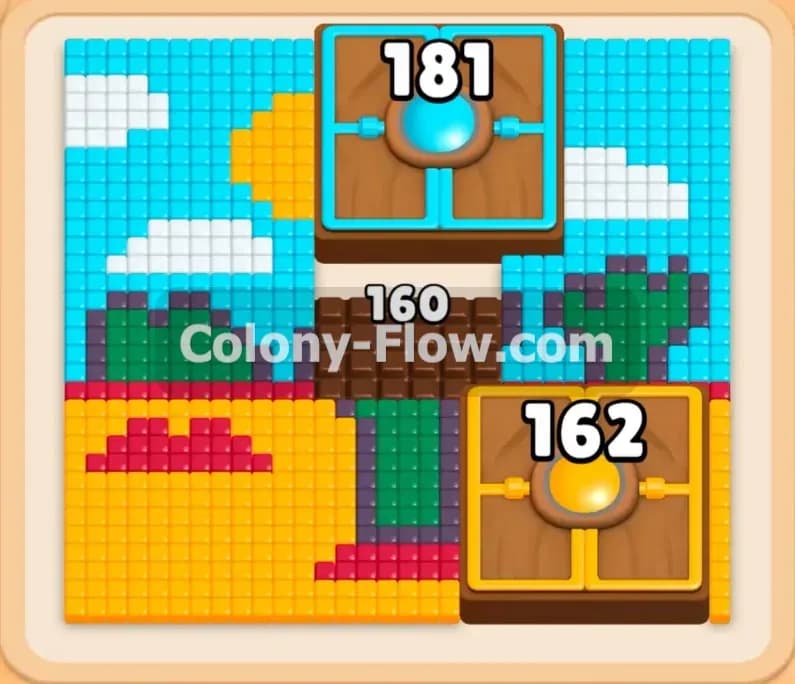
The picture on this level is a bright outdoor scene. You have a light blue sky with white clouds at the top and a bright yellow sun. The middle shows green trees with dark trunks. The bottom half features a red ground patch and a large yellow field.
However, you also have three massive obstacles in your way. Dead center on the board is a huge block of Chocolate holding a count of 160. This chocolate covers the middle food tiles and blocks the ants from moving straight up the board. At the top center sits a light blue Hungry Door with a count of 181. In the bottom right corner you will find a yellow Hungry Door holding a count of 162.
What It Takes to Clear Level 465 Board
To win this level you must clear every single tile from the picture and satisfy both Hungry Doors. The ants spawn from a single nest hole at the bottom center of the board. Because the massive Chocolate block sits right above the nest hole, your opening paths are severely restricted.
You win by chipping away the chocolate to open the center of the board. Then you feed the massive light blue and yellow Hungry Doors to get them out of your way. Your primary threat is the five waiting slots at the bottom of the screen. If you pull down blocks that the ants cannot reach, those blocks sit in the slots forever. If all five slots fill up and no ants can move, you lose the level instantly. You must always maintain at least one active path.
Colony Flow Level 465 Step by Step Solution
Step 1: Pull accessible colors to break down the central chocolate block
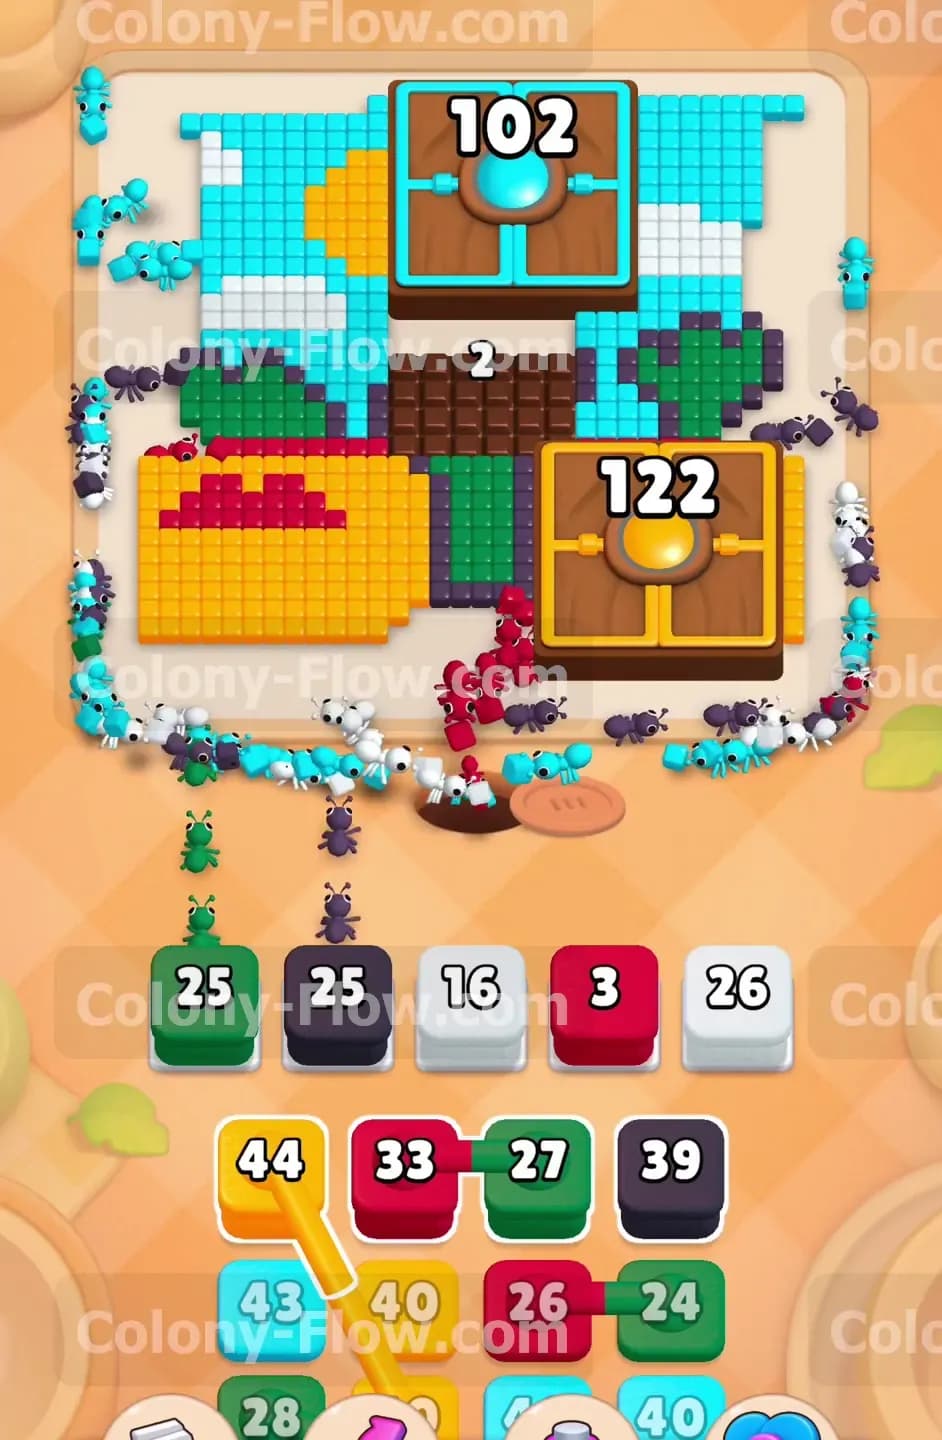
The opening moves are always the most dangerous because the board is completely clogged and paths are short. You need to focus on the tiles directly available around the giant center Chocolate block. Pull a mix of white, black, red, and green blocks into your waiting slots. The ants will march out of the nest and begin eating the white clouds, the dark tree trunks, and the red ground patches on the left. Because the ants are eating tiles right next to the central chocolate, they will also chip away at its massive 160 point health pool. Keep cycling your blocks slowly and watch the chocolate counter drop.
Step 2: Feed the right side yellow Hungry Door to keep the ants moving
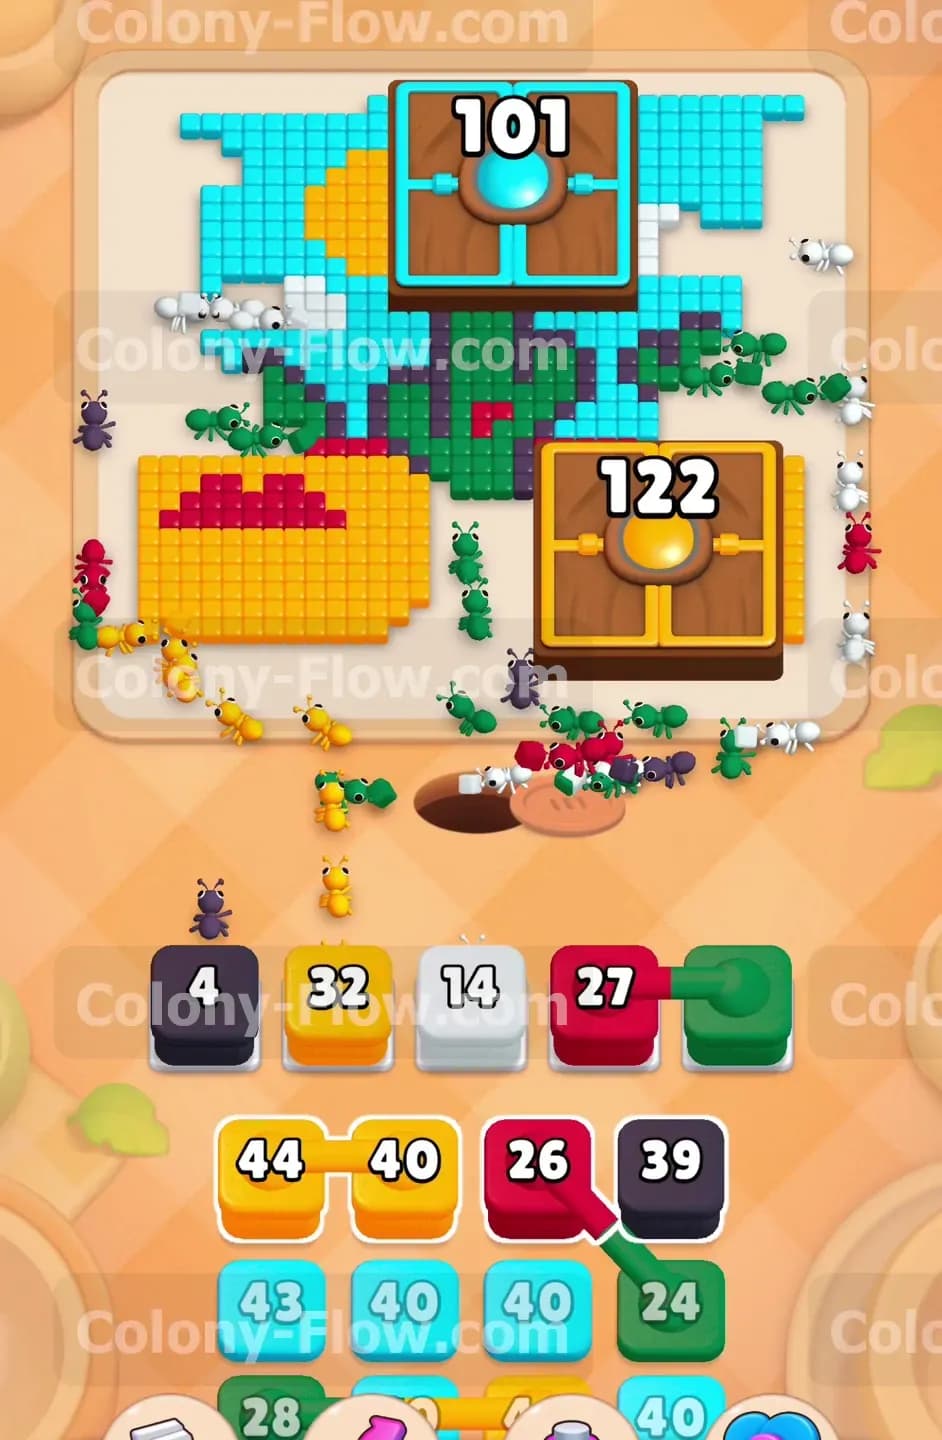
As the chocolate counter drops down to single digits and finally breaks, the center of the board opens up beautifully. This reveals the food tiles underneath and gives your ants access to the upper sections. Now you need to shift your focus to the bottom right corner where the yellow Hungry Door sits. This door requires 162 yellow points to open. Pull a yellow block down into your slots. A massive line of ants will immediately head right to start feeding that door.
Step 3: Balance the right side traffic with left side cleanup
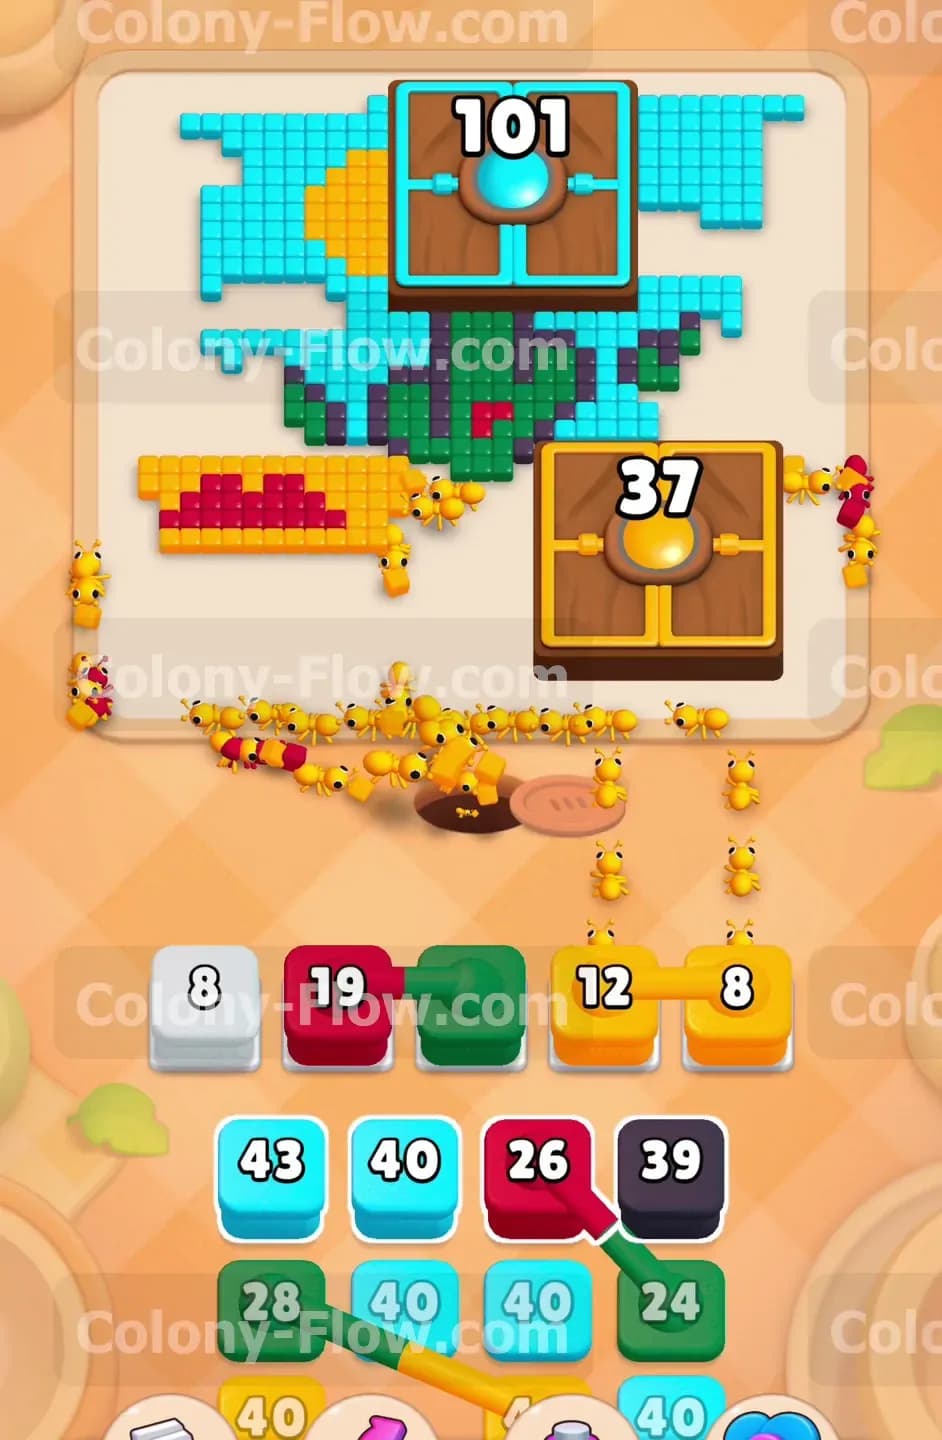
Sending hundreds of ants to the yellow Hungry Door takes time. If you fill all five of your waiting slots with yellow blocks, the ants will cause a massive traffic jam and your board will stall. To prevent this dead end scenario, you must keep the left side of the board active. While one yellow block is sitting in a slot feeding the right door, pull a red or green block. The ants will take these colors to the left side of the board to clean up the remaining red ground and green trees. This splits your ant traffic and keeps the slots cycling smoothly.
Step 4: Begin feeding the top light blue Hungry Door
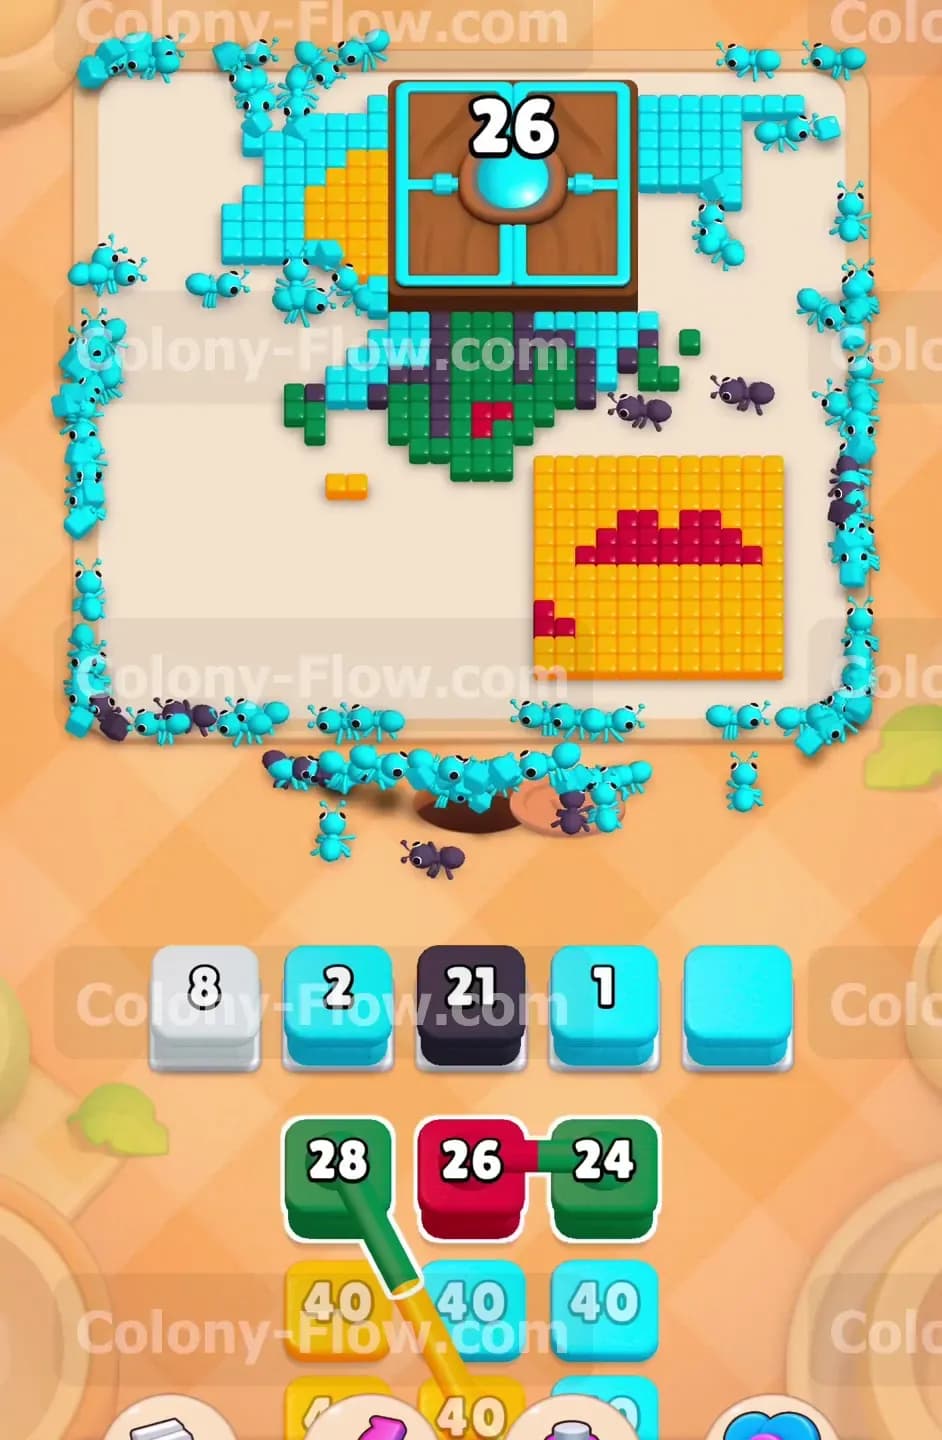
With the yellow door shrinking, you must start working on the top center Hungry Door. This door demands 181 light blue points. Pull a light blue block into your tray. The ants now have a very long trek. They must walk from the bottom nest hole all the way up the left and right edges to reach the top center of the board. Because this travel time is so long, a light blue block will sit in your waiting slot for quite a while. Never pull more than two light blue blocks at a time during this phase or you will completely jam your slots.
Step 5: Break the yellow Hungry Door to reveal the final field tiles
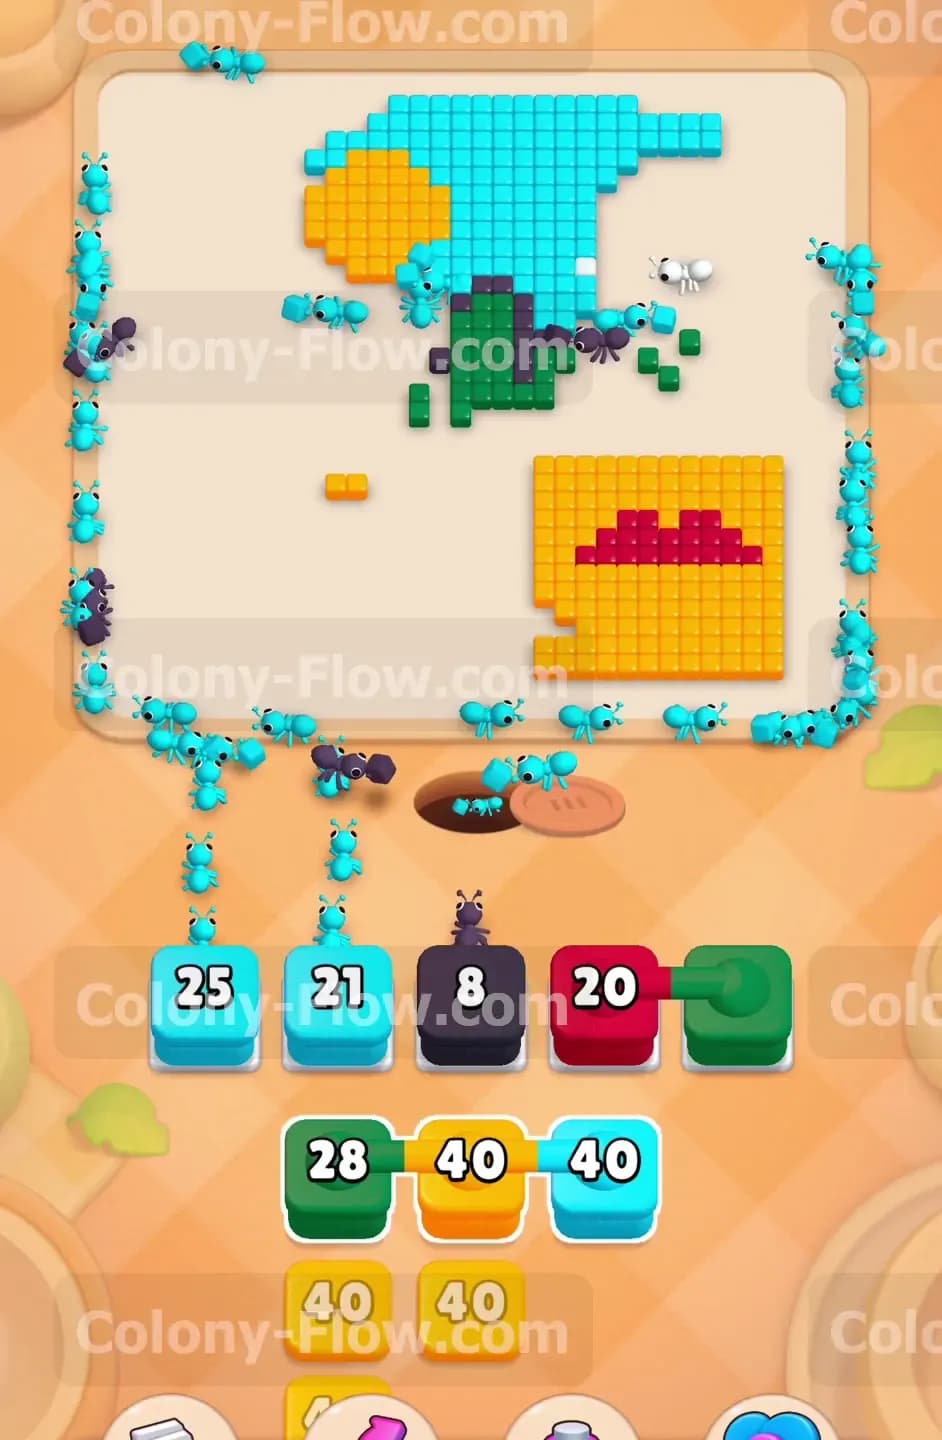
Keep alternating between yellow blocks for the right door and light blue blocks for the top door. Eventually the yellow Hungry Door will drop to zero and vanish entirely. This is a huge relief for your board space. The moment the yellow door breaks, it exposes a large section of red and yellow field tiles that were hidden underneath it. You now have immediate close range targets for your ants.
Step 6: Flood the right side to clear the newly exposed territory
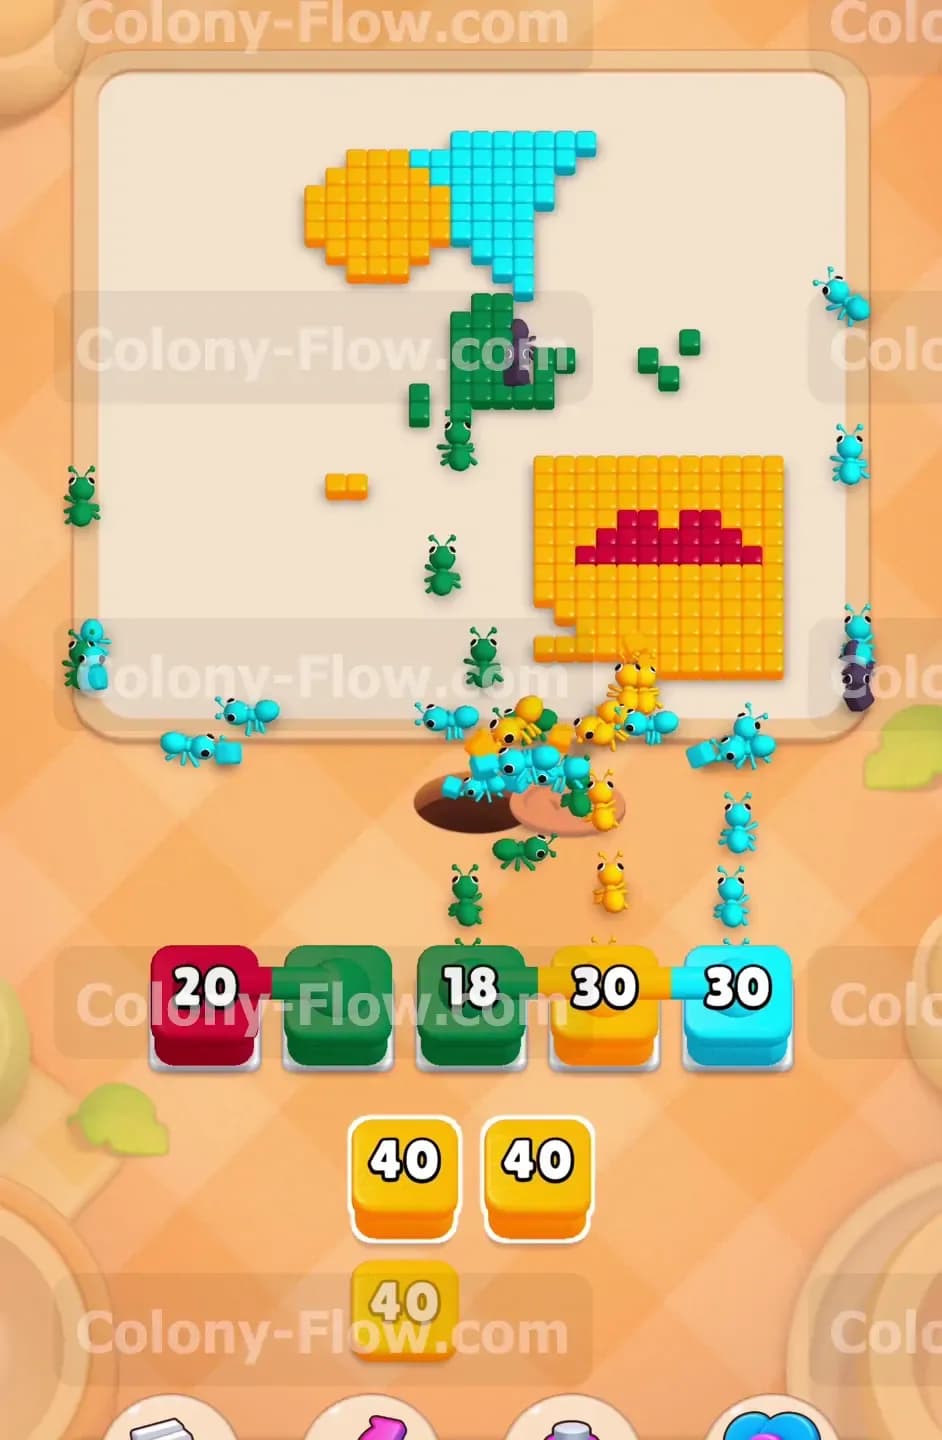
Take advantage of the broken yellow door immediately. Pull your remaining yellow and red blocks into the slots. The ants will flood into the bottom right corner and tear through that newly exposed field. Because these tiles are very close to the nest hole, the ants will eat them incredibly fast. Your slot blocks will drop to zero and clear out in seconds. This fast clear speed gives you the perfect opportunity to pull more light blue blocks for the stubborn top door.
Step 7: Shatter the top light blue Hungry Door
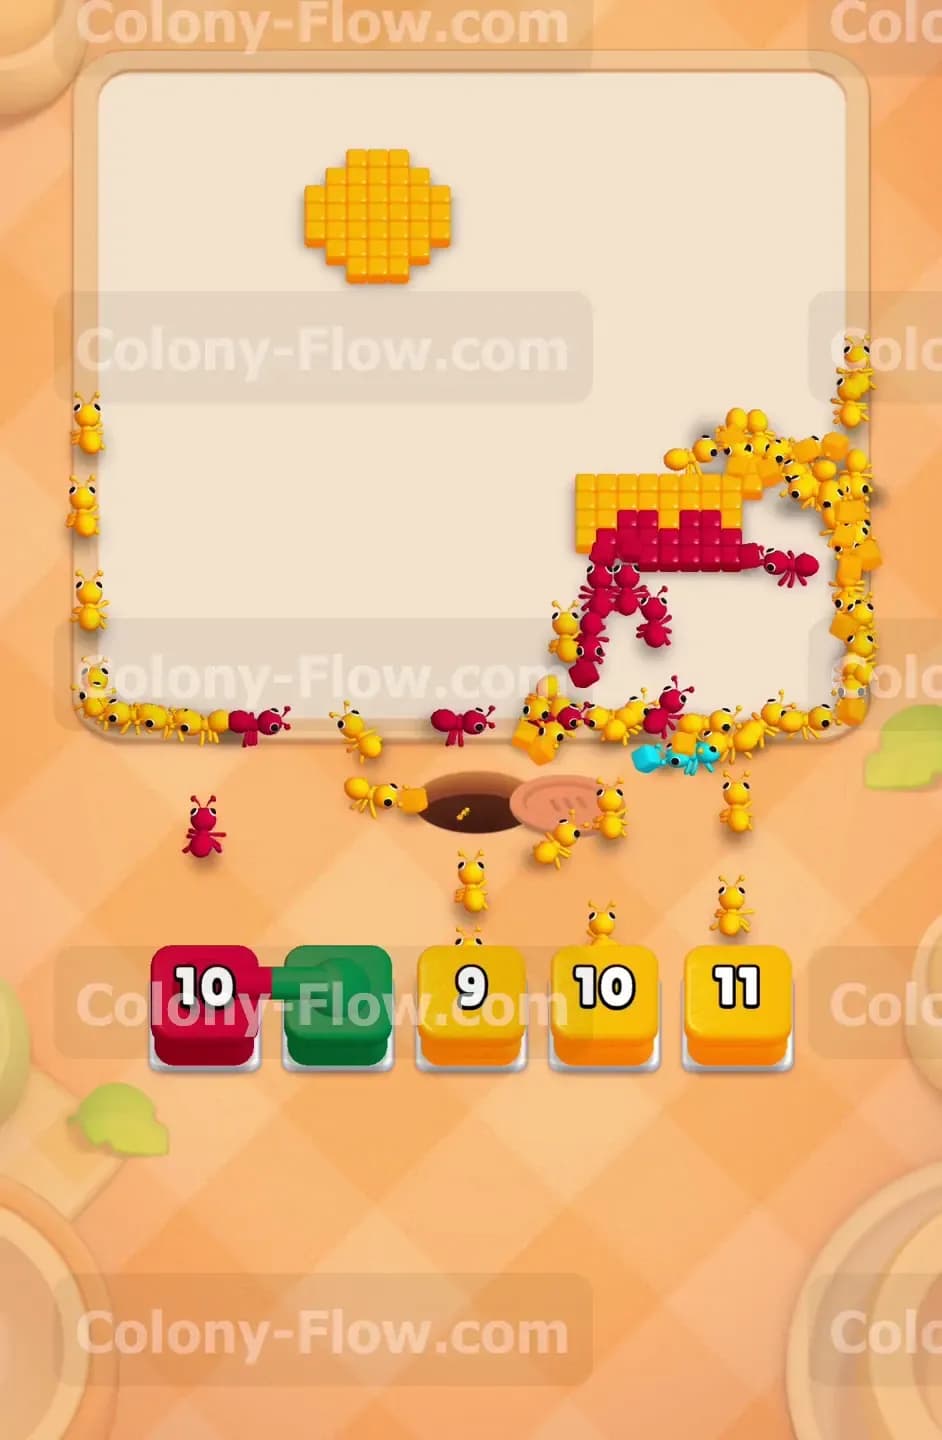
You can now fully commit to breaking the top Hungry Door. Pull your light blue blocks and let the ants swarm the top center of the board. The counter will drop rapidly from the double digits down to zero. When the door finally shatters, the entire upper sky area is exposed. The massive physical obstacles are finally gone and the board is totally open.
Step 8: Mop up the scattered sky and tree tiles to finish the level
You are now left with a scattered mess of light blue sky tiles, a yellow sun, and a few green tree tops. Look at your available tray and simply pull the colors that match what remains on the board. Since all the doors and chocolate are gone, the ants have completely unrestricted access to every single tile. Just keep pulling blocks into your slots and watch the ants race around the board to eat the final pieces. Once the last block hits zero, the picture clears and you secure the win.
Final Thought
This board tests your patience and your ability to manage long travel times. The chocolate in the center forces a very tight opening, and the two massive doors require constant attention so your slots never stall out. If you keep your block pulls balanced and never overcommit to a single long distance color, you will get through this field without breaking a sweat. If you find any of these sequences hard to visualize from the text, please watch the video above this article to see exactly how I handle the early chocolate phase. Keep those ants moving and I will see you on the next level.