Colony Flow Level 880 Walkthrough Solution & Guides | How to solve Colony Flow 880

Guide By Liam Stone
Updated on August 8, 2026
Want to skip the reading and watch instead? The video walkthrough for Level 880 is right above this article.
Video doesn't match your screen?
Game updates frequently scramble layouts! Try our AI Screenshot Solver first to find your exact board instantly, or report broken guides to our team.
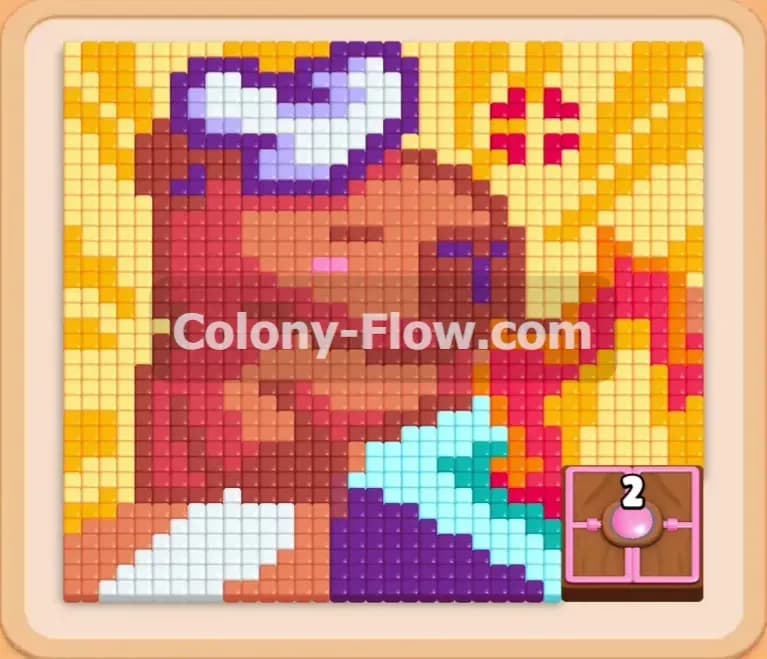
Welcome to Colony Flow Level 880. This level features a relaxing pixel art scene of a capybara sitting by a warm fire. You have a few tricky mechanics to navigate to get your colony completely through the board safely. I will show you exactly how to feed your ants and clear this picture without jamming your tray.
Colony Flow Level 880 Overview
What You Are Working With
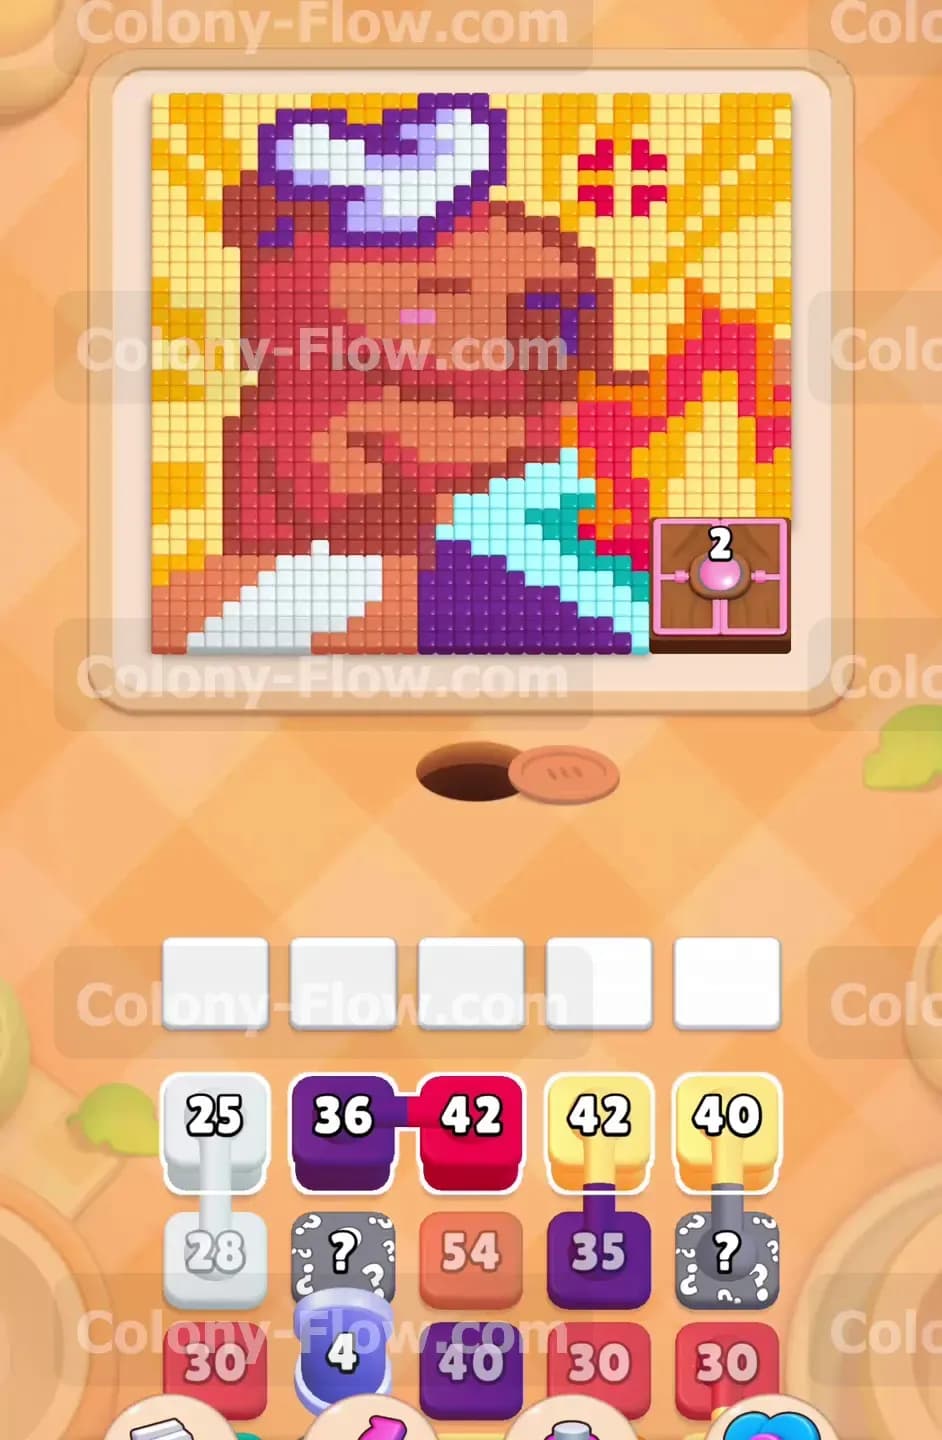
The picture shows a large brown capybara resting in the center of the board. A small white bird sits on the head of the capybara. A bright fire made of red, orange, and pink tiles burns on the right side. The ground consists of dark purple tiles and a small stepped pool of teal and light blue water. The background is mostly yellow and light yellow. A Hungry Door blocks the bottom right corner of the picture. The tray at the bottom holds your numbered blocks. You will see several Connected Boxes that move together in pairs. You will also uncover Hidden Boxes in the tray. A Hidden Box hides its color until it has a valid path to move.
What It Takes to Clear Level 880 Board
You win Level 880 by clearing every single colored tile from the picture. Your main obstacle is the five waiting slots at the bottom of the screen. If you fill all five slots with blocks that have no open path to their matching colors, your game ends immediately. You must carefully sequence your moves to keep the ants flowing. The Hungry Door requires you to clear the adjacent tiles to open it up and reach the corner. You also need to manage your tray space perfectly when pulling Connected Boxes because they instantly take up multiple slots in your waiting area.
Colony Flow Level 880 Step by Step Solution
Step 1: Clear the white bird and the dark purple ground to open the edges
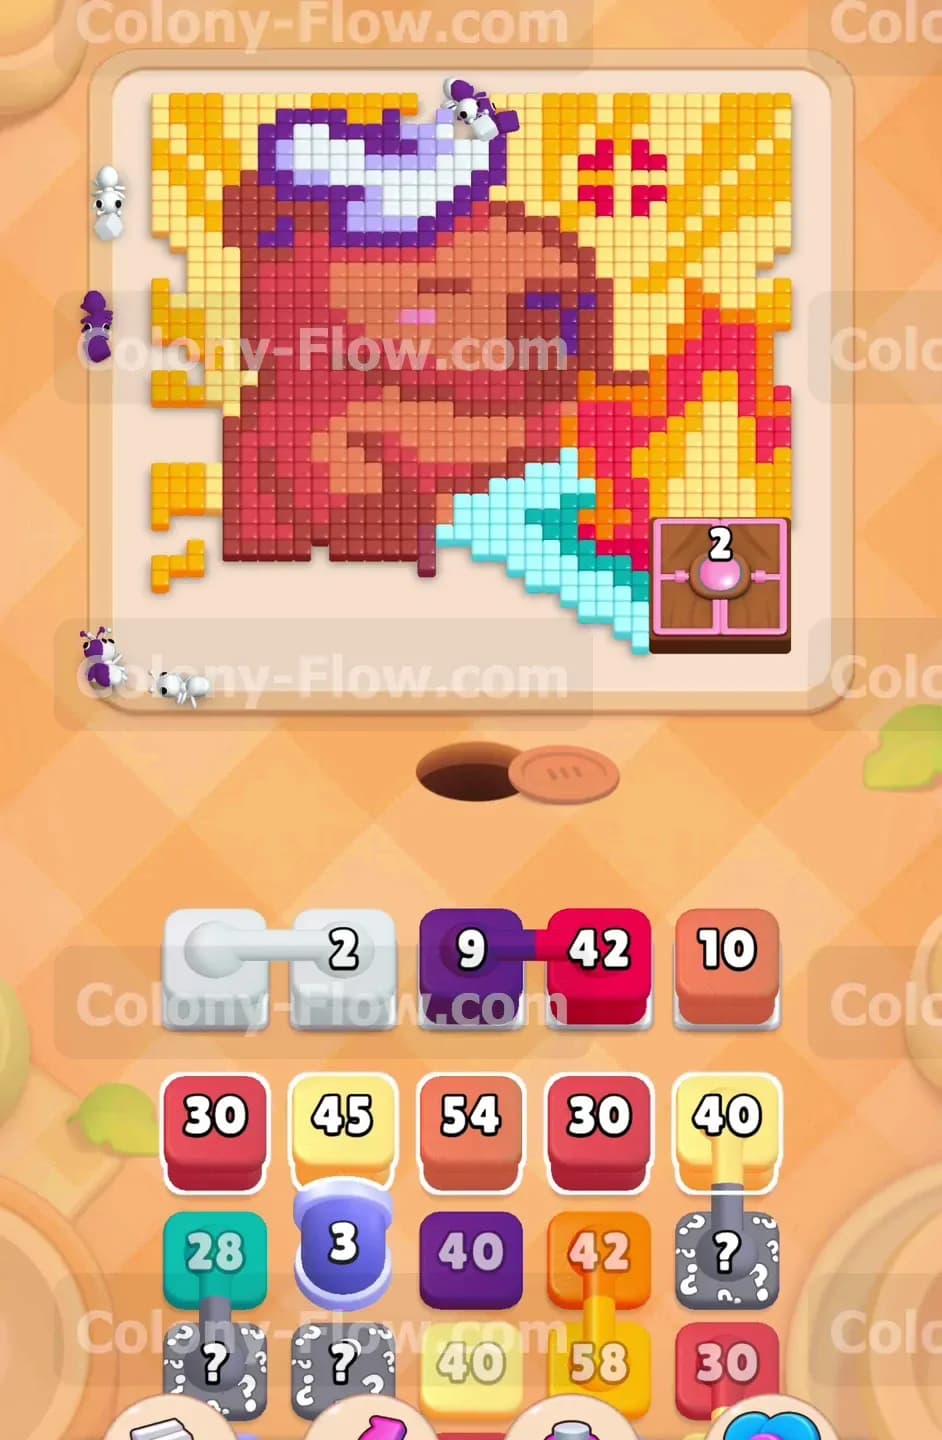
Start your game by focusing on the white block and the dark purple block in your tray. The white block contains 25 ants. Tap this white block to send your colony after the small white bird resting on the head of the capybara. The white ants will also target the small white section at the bottom left corner of the picture. Next you should tap the dark purple block. This block holds 36 ants. The dark purple ants will rush out of the nest hole and begin eating the dark purple ground along the left side. These two moves are extremely safe. The ants have clear open paths to their targets. Your waiting slots will stay busy but they will not jam. Clearing these outer colors is the best way to open up the board for the larger central blocks.
Step 2: Deploy the brown block to start feeding the large capybara
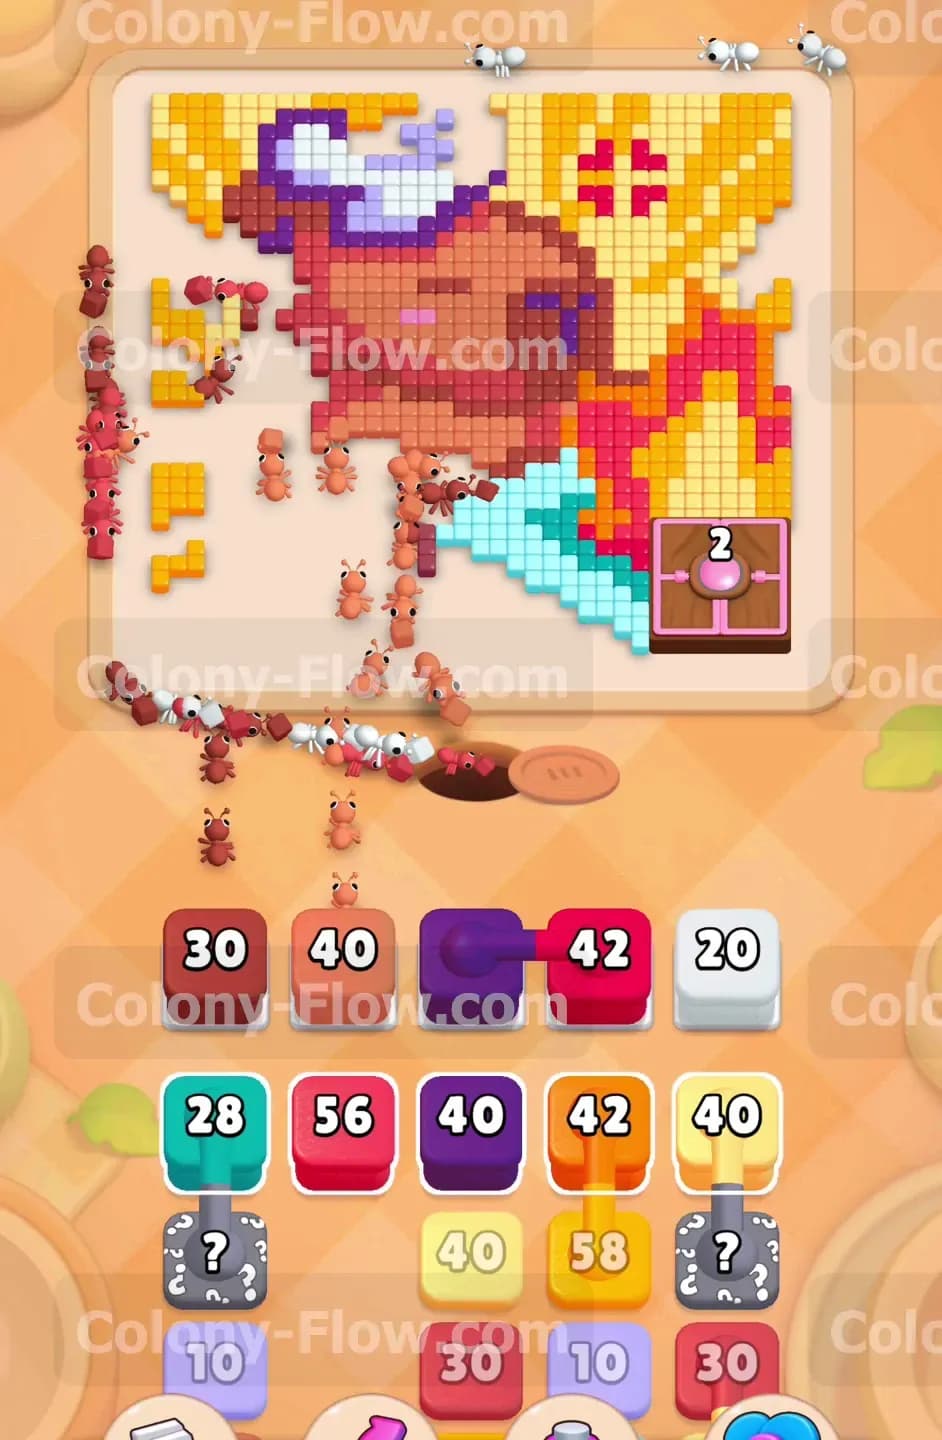
The brown capybara takes up the vast majority of the board. You need to get the brown ants working as early as possible. Look in your tray for the large brown block containing 54 ants. Tap the brown block to move it into your waiting slots. A massive swarm of brown ants will leave the nest and march straight into the center of the picture. The brown tiles form the head and the body of the capybara. Because this block has such a high number, it will sit in your waiting slot for a long time while the ants do their work. This steady flow of ants is exactly what you want. It keeps the board active and prevents the game from stalling. Do not tap too many other blocks right now. You must leave room in your tray for the upcoming colors.
Step 3: Target the red outer flames and the yellow background
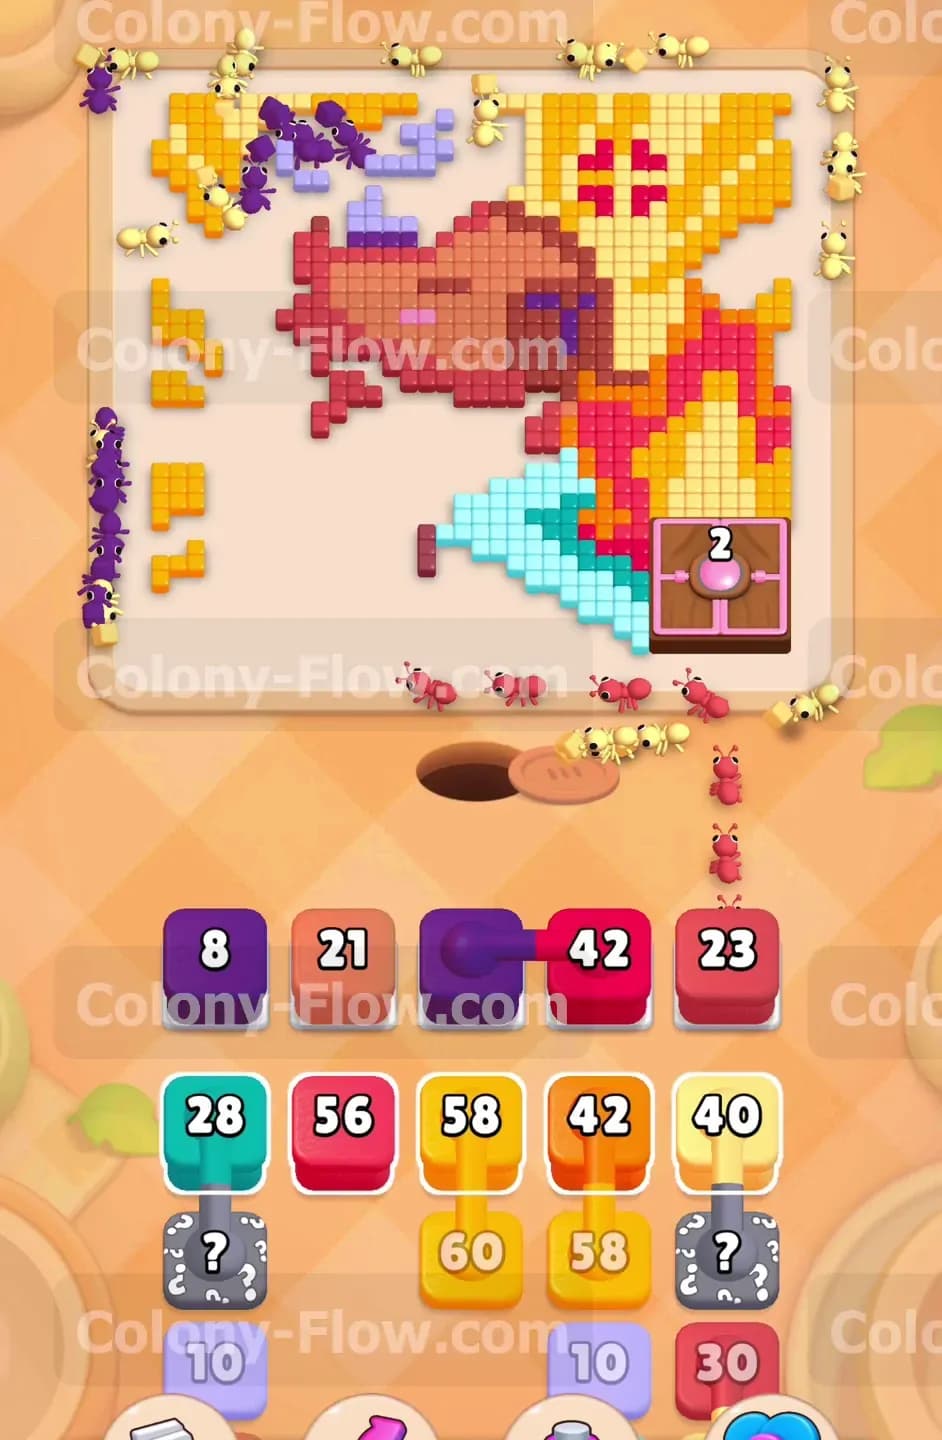
While the brown ants are busy chewing through the capybara, you can shift your attention to the right side of the board. The fire has a thick outer shell of red tiles. The background behind the entire scene consists of yellow tiles. Tap the red block containing 42 ants. Then tap the yellow block which also contains 42 ants. The red ants will stream toward the right side to eat the flames. The yellow ants will spread out across the top of the board to consume the background. These moves are critical because they carve a path toward the bottom right corner. You are slowly exposing the inner layers of the fire. Your waiting slots are now holding brown, red, and yellow blocks. The paths are wide open so your ants will continuously flow without jamming the slots.
Step 4: Clear the adjacent tiles to open the Hungry Door
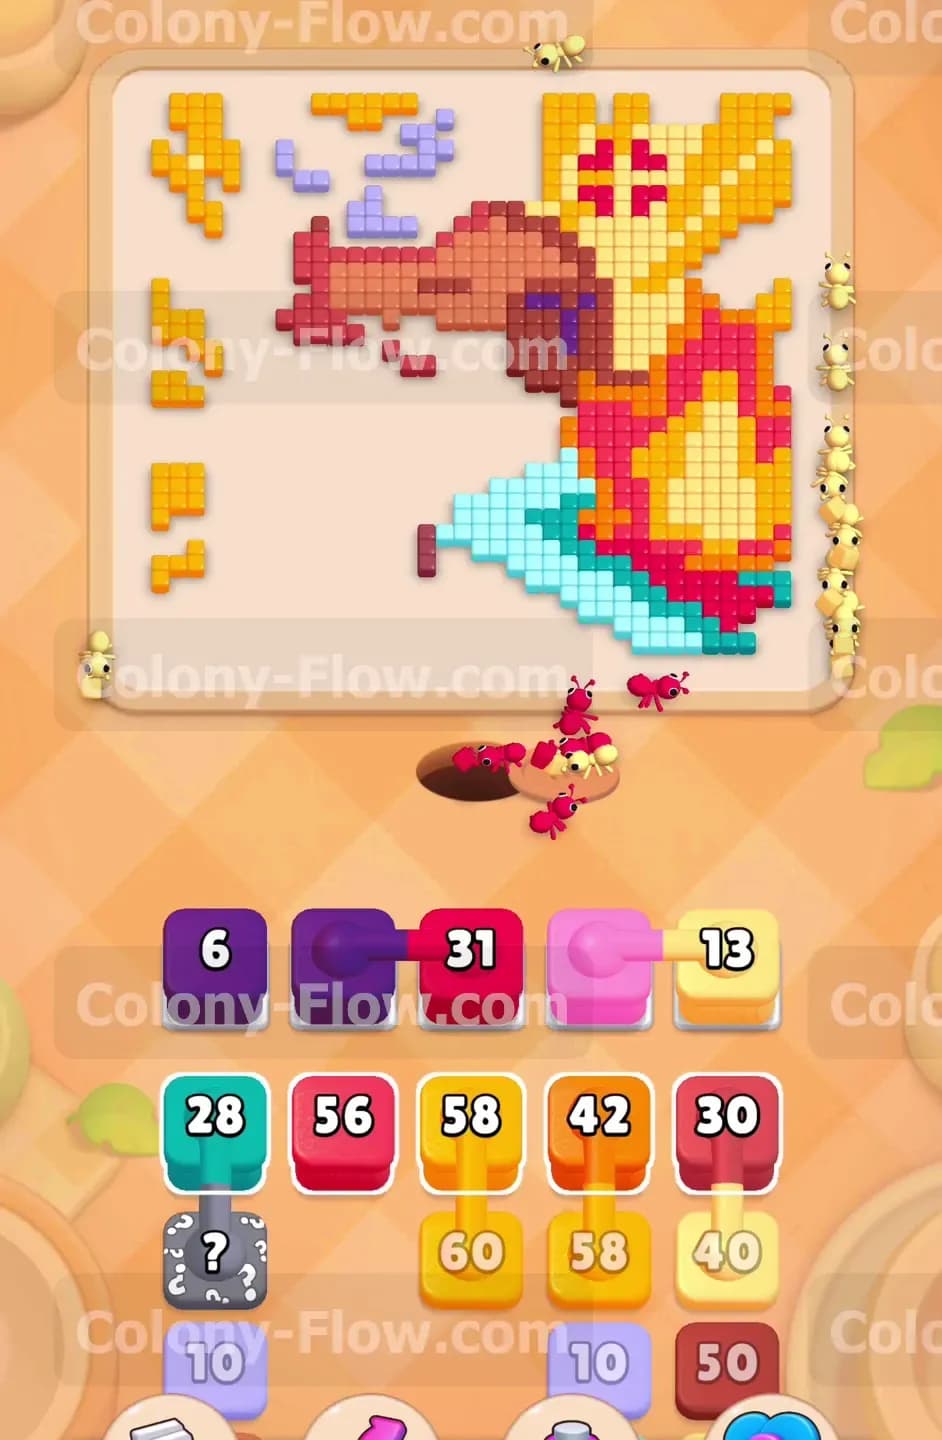
You will notice a large Hungry Door sitting over the bottom right corner of the picture. This door blocks your access to a large chunk of the fire and the background. The door has a number 2 on it. You cannot tap the door to open it. You must clear the colored tiles directly touching the door to satisfy its hunger. The red ants and yellow ants from your previous move are doing exactly this. Watch as the ants eat the red fire tiles and yellow background tiles right up to the edge of the door. Once the adjacent tiles disappear, the Hungry Door will pop open and vanish from the board. This completely unlocks the bottom right section. More red and yellow tiles are now exposed. Your active blocks will immediately send ants into this new area to clean it up.
Step 5: Uncover the hidden boxes to reveal the inner fire colors
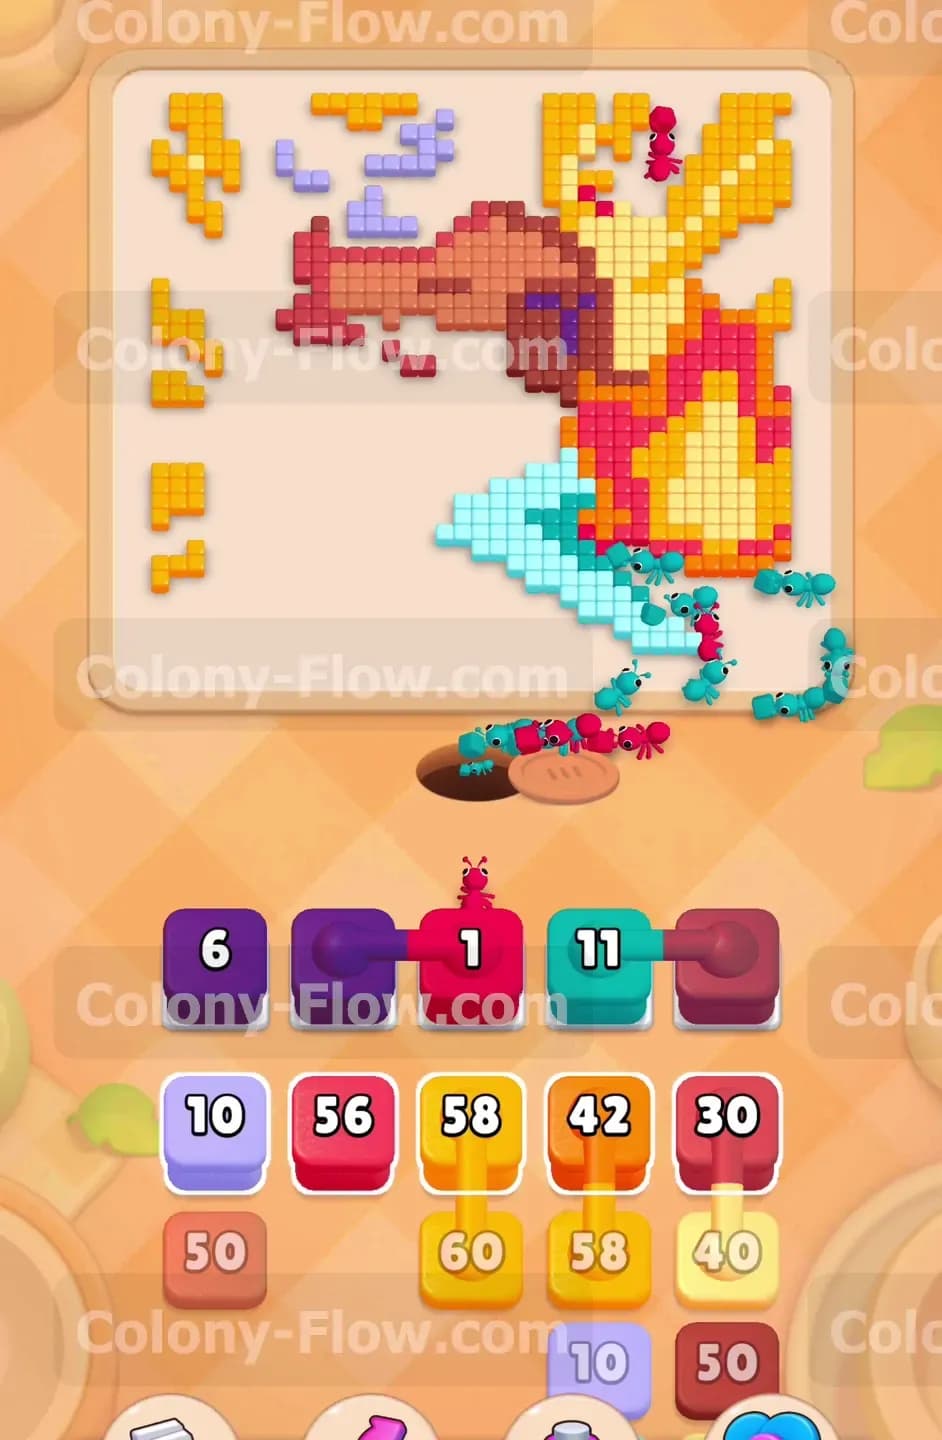
Your tray contains several Hidden Boxes marked with question marks. A Hidden Box hides its true color until it has a valid path to move. As you clear the red flames and the yellow background, you create valid paths for the inner colors. The Hidden Boxes in your tray will suddenly flip and reveal their true colors. You will see orange blocks and pink blocks appear. These colors match the inner flames of the fire. The game does this to test your patience. If you fill your slots with wrong colors before the Hidden Boxes reveal themselves, you will lose the level. Wait for the orange and pink colors to show up. This mechanic forces you to carefully control the flow of ants and keep your waiting slots empty enough to react to new colors.
Step 6: Pull the connected orange and pink blocks for the flames
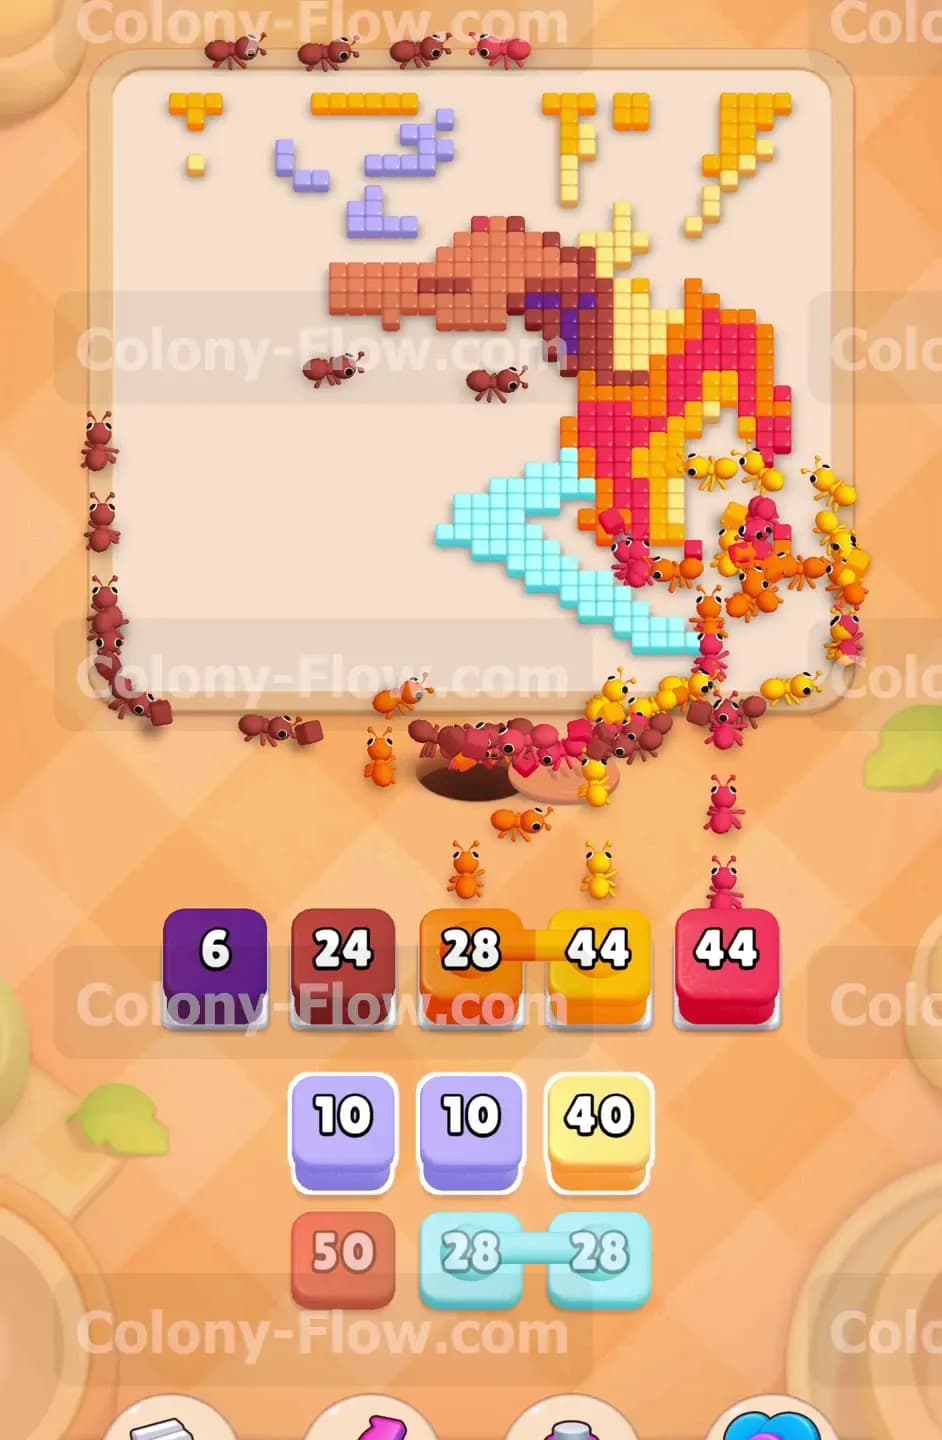
Now that the inner fire is exposed and your Hidden Boxes are revealed, you can tackle the rest of the flames. Look at your tray and find the orange block and the pink block. You will see a line linking these two blocks together. These are Connected Boxes. When you tap one of them, both blocks will jump into your waiting slots at the exact same time. You must have at least two empty slots before you make this move. If you only have one empty slot, you will cause a fatal jam. Tap the connected pair. The orange ants and pink ants will rush into the center of the fire. They will eat the bright inner flames and the small floating embers. The connected blocks will count down rapidly because the ants have a direct path to the fire.
Step 7: Clear the teal and light blue water under the capybara
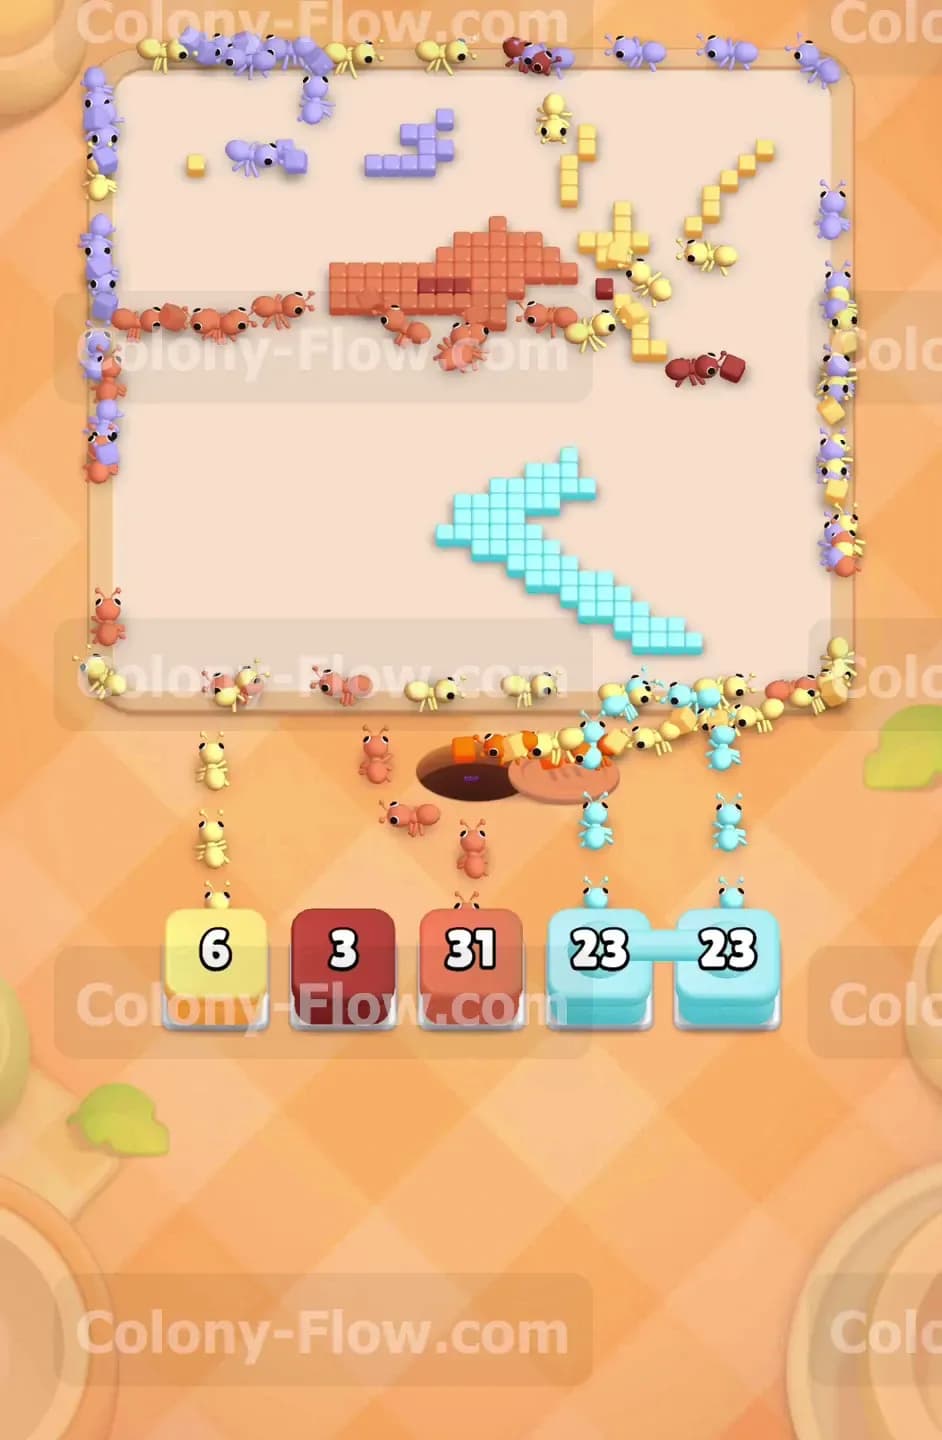
The capybara is sitting next to a stepped pool of water. The top layer of this pool is made of teal tiles. The bottom layer is made of light blue tiles. You must clear the top layer before you can reach the bottom layer. Find the teal block in your tray and tap it. The teal ants will consume the upper rim of the water pool. Once the teal tiles are gone, the light blue tiles underneath are fully accessible. Look at the bottom of your tray. You will see two light blue blocks connected together by a line. Wait until you have two open waiting slots. Tap the connected light blue blocks to send a massive wave of ants into the water. They will eat the entire bottom section of the pool. The capybara is now totally separated from the ground.
Step 8: Deploy the final remaining blocks to clean up the board
The picture is almost entirely gone. You only have a few scattered tiles left around the edges and on the capybara. Your tray has a few small blocks remaining. You have a light yellow block, a small pink block, and a final brown block. Tap the light yellow block to clear the very last pieces of the background sky in the top left corner. Tap the small pink block to finish off the remaining glowing embers above the fire. Finally you should tap the last brown block. The final group of brown ants will march up the board to eat the remaining nose and ears of the capybara. Once the final brown tile vanishes from the screen, the entire pixel art picture is clear. Your waiting slots are completely empty and you have won the level.
Final Thought
Level 880 requires a lot of patience with the Hidden Boxes and the Connected Boxes. You must always leave room in your waiting slots for unexpected block reveals. If any step is hard to follow in text, I encourage you to watch the video above this article. The visual guide will show you the exact timing for every single move.